• Home
  • Suggest A DIY
  • DIY Newsletter

Quilting

Patterns, patchworks and projects

  • About CraftGossip
  • Our Network
    • Bath & Body Crafts
    • Candle Making Ideas
    • Crochet Ideas
    • Cross Stitch
    • Edible Crafts
    • Felting Patterns
    • Glass Art
    • Home & Garden Ideas
    • Indie Crafts
    • Jewelry Making
    • Kids Crafts
    • Knitting Patterns
    • Lesson Plans
    • Needlework
    • Party Ideas
    • Polymer Clay
    • Quilting Ideas
    • Recycled Crafts
    • Scrapbooking
    • Sewing Patterns
    • Card Making
    • DIY Weddings
    • Not Craft Ideas
  • Giveaways
  • Roundups
  • Store
  • Search

Carpenter Star Quilt Pattern

June 23, 2017 by Shellie Wilson

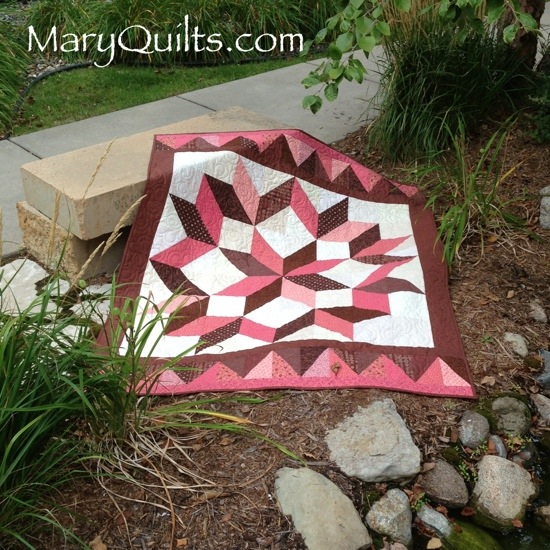
This Quilt pattern is made up of squares and half square triangles. The overall design is a large star pieced together like inlaid wood. You can grab the free pattern via this PDF file.

We have now placed the correct photo for the correct quilt link, sorry for any inconvenience.

 

«
»

Comments

  1. Gretchen says

    June 24, 2017 at 10:20 am

    That’s beautiful but that picture is not the same pattern – it’s not made of half square triangles. The pattern is but the picture is different from the pattern.

  2. Cindy S says

    June 24, 2017 at 2:48 pm

    That’s beautiful. Thanks for sharing! Just when I think I’m tired of making star quilts…

  3. Maria Rogers says

    July 30, 2017 at 3:21 pm

    That’s really anazing with your shading. Very 3D. It does not seem to be the same pattern though as the link. Your amazing shaded one has the points in two shades. Please can you tell me how to calculate to do that, or share the pattern. Thank you.
    I’m just loving Jinny Beyer shaded fabrics now and they would be perfect for this.

  4. Di says

    February 10, 2018 at 9:56 am

    Beautiful. What size are the white colored squares, how big. Is it in the pattern part?

  5. Vicky says

    February 18, 2018 at 3:00 am

    It is incredibly frustrating that the pattern in the link does not match the picture, and very sad that this has not been acknowledged and/or rectified since it was highlighted over 6 months ago.

  6. Shellie Wilson says

    March 8, 2018 at 11:09 pm

    Vicky, you may want to check the link again as it is accurate.

  7. Vicky Everitt says

    March 10, 2018 at 6:32 pm

    Hi Shellie, I have tried again, and the pdf that I get, whilst it is for a carpenters star, does not show how to achieve the effect in the quilt in the picture, which looks as though it is created in a way that does not use half square triangles.

  8. Patti Clements says

    June 18, 2018 at 8:11 am

    I agree the picture is not made with half square triangles. It is an equilateral triangle. Does anyone have the pattern for the picture? The half square pdf is very similar but it is not the same.

  9. Jennifer Cole says

    June 27, 2018 at 9:34 pm

    I would SO love to have a pattern to do this shaded rainbow carpenter star quilt! I don’t quite see how to achieve that with the pattern I printed from the pdf. Could you please help me with this soon?

  10. Mary Johnson says

    June 27, 2018 at 11:16 pm

    I was emailed and asked about this pattern … the link shared above is to a free pattern on my website and is not constructed like this quilt.

    This quilt was constructed from split diamonds … not half square triangles as I made mine. A google search for carpenter Star using split diamonds came up with this link …

    http://quiltingcubby.com/use-fabric-geometrics-for-your-next-carpenters-star/

    It appears that the quilt is in a book by Jan Krentz according to the page at the link above.

Have you read?

How to Make String Quilt Blocks (Turn Fabric Scraps Into a Beautiful String Quilt)

If you’ve got a basket of long skinny fabric scraps and no idea what to do with them, string quilt blocks are your answer.

String quilting is one of the easiest and most forgiving scrap quilt techniques. It uses narrow strips of fabric sewn onto a foundation to create bold, colorful blocks that look far more complicated than they actually are.

In this step-by-step guide, you’ll learn exactly how to make string quilt blocks, what size scraps work best, how to keep them balanced, and how to turn them into a finished quilt.

What Is a String Quilt Block?

A string quilt block is made by sewing fabric strips (or “strings”) onto a foundation piece of fabric or paper.

The strips are usually:

  • 1″–2½” wide
    • Different lengths
    • Mixed prints and colors

The result is a layered, textured block with diagonal or straight-line movement.

String quilts are ideal for:

  • Scrap bins
    • Leftover binding strips
    • Jelly roll leftovers
    • Long skinny offcuts

They are one of the most waste-efficient quilt styles.

Why String Quilts Are Perfect for Scrap Fabric

String quilts are forgiving because:

  • Strip width doesn’t have to be identical
    • Seams don’t need to align
    • Color placement can be random
    • Slight inconsistencies add charm

This makes string quilting perfect for beginners who want to build confidence without worrying about perfect matching seams.

What Size Scraps Work Best for String Quilt Blocks?

Here’s what works beautifully:

Best strip width:
1½” to 2½”

Minimum length:
At least 6″–8″

If your strips are shorter, sew them together first to create longer “strings.”

If you only have very tiny scraps, crumb quilting may be a better option.

Supplies You’ll Need

  • Assorted fabric strips
    • Foundation fabric (muslin or lightweight cotton)
    • Rotary cutter & ruler
    • Sewing machine
    • ¼” seam allowance

Optional:
• Add a center accent strip for visual structure

Step-by-Step: How to Make String Quilt Blocks

Step 1: Cut Your Foundation

Cut foundation squares slightly larger than your finished block size.

Example:
For a 10″ finished block, cut foundation pieces 11″.

You’ll trim them down later.

Step 2: Place Your First Strip

Lay your first strip right side up, diagonally across the foundation.

This will anchor the block.

Some quilters like to use a consistent center strip for cohesion.

Step 3: Add the Second Strip

Place a second strip right sides together on top of the first strip.

Sew with a ¼” seam.

Flip open and press.

Step 4: Continue Adding Strips

Keep adding strips to one side until you reach the edge of the foundation.

Then flip the block and fill the opposite side.

Press regularly to prevent bulk.

Step 5: Trim the Block

Once the foundation is fully covered:

Flip block foundation side up.
Trim to your exact unfinished size.

If your finished block is 10″, trim to 10½”.

This squaring step is important.

Popular String Quilt Layout Ideas

String quilt blocks are surprisingly versatile.

Try:

  • All diagonal strips same direction
    • Alternate block rotation
    • Chevron layout
    • Controlled color gradient
    • Neutral center strip
    • Red center “spine” for classic look

Rotating blocks creates secondary patterns automatically.

How Many String Quilt Blocks Do You Need?

For 10″ finished blocks:

Baby Quilt (40″ x 50″) – 20 blocks
Lap Quilt (50″ x 60″) – 30 blocks
Throw Quilt (60″ x 70″) – 42 blocks
Twin Quilt (70″ x 90″) – 63 blocks

Adjust based on sashing and borders.


How to Keep String Quilts From Looking Chaotic

Scrap quilts need balance.

Use one or more of these tricks:

  • Repeat one neutral strip in every block
    • Keep background color consistent
    • Limit to 2–3 dominant color families
    • Alternate light and dark blocks
    • Add sashing

Structure keeps string quilts from feeling messy.

Beginner Mistakes to Avoid

  • Using strips that are too narrow (creates bulk)
    • Not pressing seams
    • Skipping trimming step
    • Mixing drastically different fabric weights
    • Forgetting seam allowance when trimming

Foundation fabric prevents stretching — don’t skip it.

Paper vs Fabric Foundation for String Quilts

Fabric foundation:
• Stays in quilt
• Adds stability
• Faster

Paper foundation:
• Removed after sewing
• Lighter finished quilt
• Slightly more work

Most beginners prefer fabric foundation.

Why String Quilts Are So Addictive

They’re repetitive in a relaxing way.

You can:

  • Sew without overthinking
    • Use scraps guilt-free
    • Chain piece easily
    • See fast progress

And somehow, those random strips always look intentional once trimmed into a square.

Making String Quilt Blocks

If your scrap basket is overflowing with strips, a string quilt block is one of the smartest ways to use them.

It’s forgiving.
It’s flexible.
And it turns leftover fabric into something bold and cohesive.

You don’t need perfectly matched prints.
You just need a consistent block size and a little trimming discipline.

The rest is just stitching.


Categories

Christmas quilts Craft Competitions Craft News and Events Free Quilt Patterns Modern More Quilting Patterns & Projects Quilting Art Quilts Quilting Blocks Quilting Books Quilting Contest Quilting Events Quilting Fabric Quilting Gift Ideas Quilting How To & Tutorials Quilting Inspiration Quilting Products Quilting Technique Scrap Fabric Tutorials and Patterns

RSS feed: More Articles More Articles

  • Mini Mending Mondays: Patch a Child’s Leggings Knee Without Using a Sewing Machine
  • Crafts to Celebrate Hispanic Heritage Month
  • Crochet Colourful Doily Pillow – Bright, Easy, and a Great Scrap Yarn Project
  • Free Printable Food Gift Tags for Homemade Treats
  • DIY Sushi Bowls and Ceramic Chopsticks with Koi Wave Pottery Transfer Paper
  • Free Crochet Diwali Lantern Wind Spinner Pattern – Bright Festival of Lights Decoration
  • Cross Stitch on Anything with Waste Canvas
  • Halloween Hand Embroidery Pattern Bundle – Etsy Review
  • 20 FREE Rustic and Rural Landscape Printables
  • How to Make String Quilt Blocks (Turn Fabric Scraps Into a Beautiful String Quilt)

Copyright © 2026 · CraftGossip | Start Here | Contact Us | Link to Us | Your Editors | Privacy and affiliate policy