If you’ve ever finished piecing and quilting a project, only to stare at the raw edges thinking now what?, you’re not alone. Binding a quilt is one of those steps that can feel intimidating, especially when it comes to getting those corners neat and tidy. I’ll admit, my first few quilts had corners that looked more like crumpled origami than crisp folds. But over time, I discovered that binding doesn’t have to be stressful—it can actually be one of the most satisfying steps.
In this guide, I’ll show you how to bind a quilt the easy way, with simple techniques that will leave you with perfect corners every time. Whether you’re brand new to quilting or just looking for a smoother process, this method is reliable, beginner-friendly, and leaves your quilt looking polished.
What You’ll Need
- Quilt sandwich (quilt top, batting, backing) quilted and squared up
- Binding strips (2 ½” wide is standard)
- Sewing machine with walking foot (recommended)
- Pins or binding clips
- Scissors and a rotary cutter
- Iron and pressing board
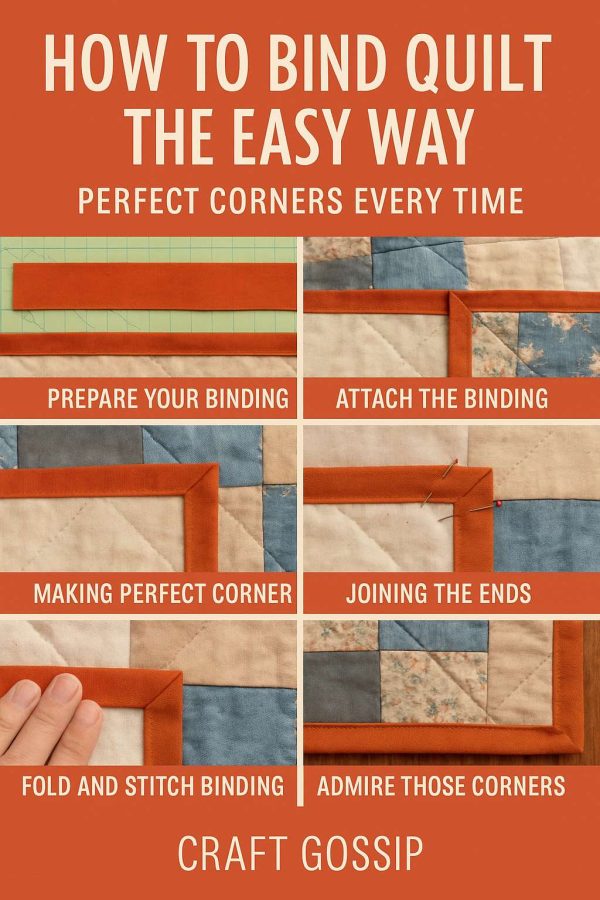
Step 1: Prepare Your Binding
Cut strips of fabric 2 ½” wide. Sew them together end-to-end with diagonal seams to create one long strip. Press the seams open. Then fold the strip in half lengthwise, wrong sides together, and press.
Pro tip: Joining strips on the diagonal reduces bulk, which helps the binding lie flatter.
Step 2: Attach the Binding to the Front
Starting in the middle of one side, align the raw edge of the binding with the raw edge of the quilt top. Leave about a 10-inch tail before you start sewing—this will make it easier to join the ends later. Sew with a ¼” seam allowance, using a walking foot to keep layers feeding evenly.
Step 3: Making Perfect Corners (Mitered Corners)
Here’s the magic moment for crisp, professional corners:
- Sew up to ¼” from the edge of your quilt, then stop and backstitch.
- Remove the quilt from your machine. Fold the binding strip up so it makes a 45° angle.
- Then fold it back down, aligning the raw edge with the next side of the quilt.
- Clip or pin in place. Resume sewing from the top edge.
Repeat this process at every corner. These folds create neat mitered corners that tuck in beautifully when finished.
Step 4: Joining the Ends
When you come back around to where you started, stop sewing about 10 inches before the beginning. Lay one binding tail over the other and mark where they overlap. Cut so they overlap by exactly 2 ½” (the width of your strip). Sew the ends together with a diagonal seam, press open, then finish sewing the binding to the quilt.
Step 5: Fold and Stitch the Binding to the Back
Flip the binding over the raw edges to the back of the quilt and clip it in place. For the easiest finish, machine stitch close to the edge of the fold on the back. If you prefer a more traditional look, you can hand-stitch the binding invisibly.
Pro tip: For machine stitching, use matching thread on the top and bobbin so any little wobbles blend right in.
Step 6: Admire Those Corners
When you flip the quilt over, your corners should form neat little mitered folds. If one looks a bit wonky, don’t panic—it happens to the best of us. With practice, they get crisper every time.
Why Binding Matters
Binding isn’t just a finishing step—it frames your quilt and protects those hard-earned edges. Done right, it adds durability and gives your quilt that professional look. And when you master an easy method with sharp corners, binding shifts from being the dreaded “last chore” to the cherry on top of your quilting process.
I still remember the first quilt where my corners turned out perfectly—it was a small lap quilt, and I must have shown every member of my family those corners like they were a prize-winning pie. The truth is, little victories like that are what keep us sewing.
So grab those strips, pour yourself a cup of tea, and try this easy binding method on your next quilt. Perfect corners, here you come.