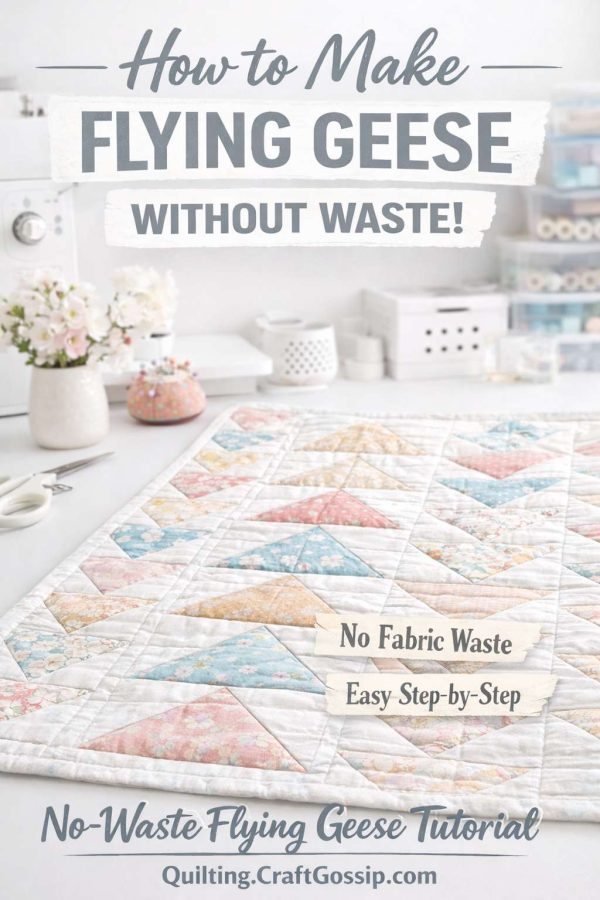
If you’ve ever searched for how to make Flying Geese without waste, chances are you’ve already trimmed off a small pile of fabric corners and thought, “There has to be a better way.”
Good news — there is.
The no-waste Flying Geese method is one of the most efficient quilting techniques you can learn. It saves fabric, improves accuracy, and creates four identical Flying Geese units at once. Once you try it, the old stitch-and-flip method starts to feel unnecessarily messy.
Whether you’re working on a star quilt, modern geometric quilt, or building a border full of triangles, mastering this technique will instantly upgrade your quilting.
What Is a Flying Geese Quilt Block?
A Flying Geese quilt block is a rectangular unit made from:
- One large center triangle
• Two smaller side triangles
The block is traditionally twice as wide as it is tall. For example:
- 2″ x 4″ finished
• 3″ x 6″ finished
• 4″ x 8″ finished
Flying Geese blocks are commonly used in:
- Sawtooth Star quilt patterns
• Quilt borders
• Modern arrow quilts
• Barn quilt designs
• Traditional sampler quilts
Because they’re so versatile, knowing how to make Flying Geese blocks accurately is essential for both beginner and experienced quilters.
Why Use the No-Waste Flying Geese Method?
The traditional stitch-and-flip method works, but it wastes fabric and requires trimming dog ears. The no-waste Flying Geese tutorial method eliminates that problem by creating four units at once — with virtually no scraps.
Benefits of the no-waste method:
- Less fabric waste
• More accurate triangle points
• No trimming excess corners
• Faster batch sewing
• Perfect for scrap quilting
• Ideal for pre-cuts like charm packs
If you love efficient quilting techniques, this method is a must-learn.
How to Make Flying Geese Without Waste (Step-by-Step Tutorial)
This no-waste Flying Geese method creates four identical units at the same time.
Step 1: Cut Your Fabric
You will need:
- 1 large square (main triangle fabric)
• 4 small squares (side triangle fabric)
Flying Geese Cutting Formula
For a finished Flying Geese size of:
Height x Width (example: 3″ x 6″)
Cut:
Large square = Finished height x 2 + 1¼”
Small squares = Finished height + ?”
Example for a 3″ x 6″ finished Flying Geese block:
Large square: 6½”
Small squares: 3″
Accurate cutting is the key to sharp points — double-check before sewing.
Step 2: Mark the Small Squares
On the wrong side of each small square, draw a diagonal line from one corner to the opposite corner.
This will be your stitching guide.
Step 3: Sew the First Two Squares
Place two small squares on opposite corners of the large square, right sides together.
The diagonal lines should form one straight line across the large square.
Sew a ¼” seam on both sides of each drawn line.
Step 4: Cut and Press
Cut directly on the drawn line.
You’ll now have two heart-shaped units.
Press the small triangles outward. Press carefully — stretching at this stage can distort your block.
Step 5: Add the Remaining Squares
Place one remaining small square on each unit, right sides together, aligned with the open corner.
Again, sew ¼” on both sides of the diagonal line.
Step 6: Cut and Press Again
Cut along the drawn line and press open.
You now have four identical Flying Geese units — made with virtually no waste.
No trimmed corners. No fabric pile beside your machine. Just clean, sharp triangles.
Flying Geese Size Chart (Quick Reference Guide)
Here are common Flying Geese measurements for popular finished sizes:
Finished Size: 2″ x 4″
Large square: 4¼”
Small squares: 2?”
Finished Size: 3″ x 6″
Large square: 6½”
Small squares: 3″
Finished Size: 4″ x 8″
Large square: 8½”
Small squares: 4″
Keep this size chart handy if you use Flying Geese blocks regularly.
Tips for Sharp Flying Geese Points
If your points are getting chopped off when assembling rows, try these tips:
- Sew a slightly scant ¼” seam allowance
• Press instead of ironing back and forth
• Avoid stretching on the bias
• Measure before trimming
• Square up only if necessary
Most problems with Flying Geese quilt blocks come from inaccurate cutting or pressing too aggressively.
When to Use the No-Waste Flying Geese Method
This method works best when:
- You need multiple identical Flying Geese units
• You’re making star quilt blocks
• You’re creating a Flying Geese border
• You’re working with scrap fabric
• You’re using charm packs or pre-cuts
If you only need one or two units, the stitch-and-flip method may be quicker. But for full quilt layouts, the no-waste Flying Geese technique saves both time and fabric.
Best Quilt Patterns That Use Flying Geese Blocks
Flying Geese quilt blocks are frequently found in:
- Sawtooth Star quilts
• Arrow quilts
• Christmas tree quilt patterns
• Barn quilt designs
• Modern minimalist quilts
If your quilt design features repeated triangle shapes, learning how to make Flying Geese without waste will dramatically improve your workflow.
Why Scrap Quilters Love This Method
If your scrap bin seems to refill itself overnight (same here), the no-waste Flying Geese tutorial method is perfect.
Because you’re cutting squares instead of triangles, you get:
- Better fabric stability
• Less bias stretch
• Cleaner grain alignment
• Easier pre-cut storage
• More efficient fabric use
It’s ideal for scrap quilting, jelly rolls, and leftover 5″ charm squares.
Learning how to make Flying Geese without waste is one of those small quilting upgrades that makes everything feel smoother.
Less trimming.
Less fabric waste.
Sharper points.
Cleaner construction.
Once you’ve sewn a batch using this no-waste Flying Geese method, it quickly becomes second nature — and you’ll wonder why you ever did it differently.
If you’re planning a star quilt, a bold border, or a modern geometric design, this technique will serve you well for years to come.