• Home
  • Suggest A DIY
  • DIY Newsletter

Quilting

Patterns, patchworks and projects

  • About CraftGossip
  • Our Network
    • Bath & Body Crafts
    • Candle Making Ideas
    • Crochet Ideas
    • Cross Stitch
    • Edible Crafts
    • Felting Patterns
    • Glass Art
    • Home & Garden Ideas
    • Indie Crafts
    • Jewelry Making
    • Kids Crafts
    • Knitting Patterns
    • Lesson Plans
    • Needlework
    • Party Ideas
    • Polymer Clay
    • Quilting Ideas
    • Recycled Crafts
    • Scrapbooking
    • Sewing Patterns
    • Card Making
    • DIY Weddings
    • Not Craft Ideas
  • Giveaways
  • Roundups
  • Store
  • Search

Review: Why I kicked my Rowenta to the curb

April 4, 2013 by Scarlett Burroughs

Panasonic iron

I have to admit, I was not thrilled about receiving a Panasonic iron to review. After all, I own a Rowenta. Even so, I dutifully set up a sewing day with my daughter to try it out. We planned to embellish some onsies and burp rags, yes very quick and easy. Arriving at her house with the thing still in the box, I was not prepared for what I discovered. The Panasonic NI-L70SR Cordless Iron is a dream. It’s pretty and smartly designed.

How clever of it to come with a carrying case – so handy for traveling to and fro. But by far the most appealing feature for me is that it’s cordless (the iron sits on a charging base with a retractable cord) so the cord stays out-of-the-way, plus the base is very stable. If you have a child and/or pet underfoot, you will not worry as much about them knocking the iron off the board and onto their heads.
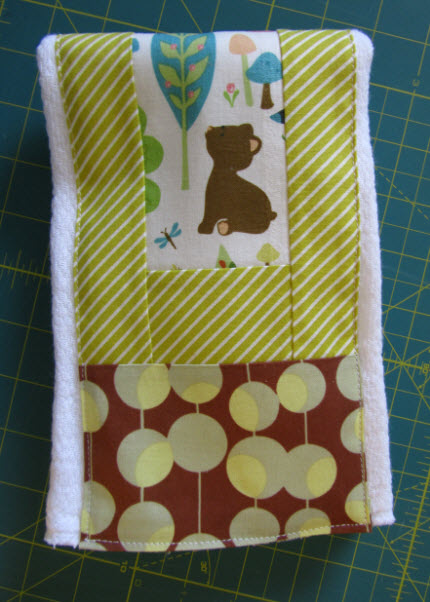
burp rag resized

Here’s one of the burp rags I made while testing the iron. I embellished a plain diaper with some scraps of fabric. At first I worried the iron would not stay hot enough, but it did so nicely throughout the course of the project. It also reheats quickly after it auto shuts off. The steam feature works fine and is easy to fill with water.

Nothing is perfect and I do have some things I’d like to change. I wish the cord was longer and on the other end of the base. But that’s just me. All in all, I L-O-V-E this iron. I use it exclusively instead of my once cherished Rowenta. Yes, you know you want one of these irons. And I have good news. Panasonic is giving away an iron to a lucky Craft Gossip reader.

Stay tuned for giveaway details in a future post!
«
»

Comments

  1. MichelleGB says

    April 5, 2013 at 3:16 am

    Looking forward to hearing more about this. My iron is dying and I need to find a replacement.

  2. Betsy says

    April 5, 2013 at 3:16 am

    I love that burp cloth. Do you know of a tutorial I can look at?

  3. Donna says

    April 5, 2013 at 3:48 am

    Enjoyed your review – I don’t think I’ve ever had an iron last more than 2 years. Most are not sturdy, can’t handle a lot of work, and leak like a sieve.

  4. Margie says

    April 5, 2013 at 4:06 am

    You’re right…I DO want one of these irons!

  5. Leslie Andersen says

    April 5, 2013 at 4:57 am

    Hi Scarlett! Yes, I DO want that iron! I’ll be watching for details on the give away.

  6. judy parsons says

    April 5, 2013 at 5:11 am

    Love the iron. Would also like to learn how you made the cute burp rag.
    Judy

  7. Mary Mayshack says

    April 5, 2013 at 5:15 am

    I am going to be looking for this iron online in a few.I want one.
    Mary

  8. Maura says

    April 5, 2013 at 5:19 am

    I’d like to see how it does on denim, upholstery weight fabric

  9. Alice Clark says

    April 5, 2013 at 5:20 am

    Who knew in this day and age that it would be possible to get excited about an iron? But I am! Want this marvelous Panasonic cordless!

  10. patsquared2 says

    April 5, 2013 at 5:27 am

    I bought one of the Panasonics almost 18 months ago and I LOVE IT! I sew clothing, mostly and this little baby is superb – hot enough, great soleplate and you can use both ends to finish corners. I am so glad I bought this one.

  11. Karen Miller says

    April 5, 2013 at 5:29 am

    I have a cordless iron I received as a gift from my DH several years ago. I love it! In fact, I haven’t used my corded iron since.

  12. Mosaic Magpie says

    April 5, 2013 at 6:46 am

    Love the burp cloths. I kicked my Rowenta to the curb a couple of years ago. Like the old grey mare….they ain’t what they used to be. I thought a cordless iron would not stay hot, so I am glad to read this review. Ironing is a chore so it is nice to find an iron that makes the job a bit easier.
    Deb

  13. Louise w. says

    April 5, 2013 at 6:53 am

    The iron sounds like a dream! Thanks for the opportunity to win!

  14. Diane says

    April 5, 2013 at 7:14 am

    I also had a Rowenta as I am a quilter and thought this was the end all be all. Well, not.It died and I now look for an iron the is heavy in weight as I think they press better. I would love to try this iron and being cordless is such a great feature.

  15. Leah B says

    April 5, 2013 at 8:16 am

    I love that it is cordless, I am always wrestling with the cord!

  16. Barbara says

    April 5, 2013 at 10:01 am

    Do you have info on weight or pricing? Sounds promising, but I have been a Rowenta “lifer”.

  17. Neesey Gebalski says

    April 5, 2013 at 11:39 am

    Wow, finally a cordless iron. Who wudda thunk! Thanks for a chance to win one. I have 2 of the pricey R irons.

  18. Lisalovestosew says

    April 5, 2013 at 1:43 pm

    I’d love to hear more about thus iron. I have a Rowenta steam iron, but use my Maytag cordless iron for retreats and other projects. I’m glad to hear that there is a company other than Oreck that is making cordless irons. I bought my last cordless iron used on eBay!

  19. Theresa says

    April 5, 2013 at 5:17 pm

    I could use a cordless iron when I go to crafting classes. What I always hate about irons is that they claim to be “dripless” but then my articles are always covered with water drops.

  20. Kaci says

    April 6, 2013 at 7:32 pm

    THIS IS MY FAVORITE SEWING ITEM EVER!!! I have this iron and LOVE IT!!! i’ve had mine for a little over 3 years now and it’s still going strong (despite moving around the world 3 times!). It doesn’t drip, it heats up very nicely (not scorching but enough to get a great press!) and cords are so annoying! It’s so annoying to use my mom’s normal iron when I visit her. haha. If you are even remotely considering this iron, buy it!!!

  21. Suzanne B says

    April 7, 2013 at 2:06 pm

    I had two high end Rowenta’s each lasting less than a year. I am one of the few that is so not going to buy a Rowenta ever again.

  22. Diane Seymour says

    April 7, 2013 at 5:07 pm

    I have only owned two irons, one when I went to college and my present one that I bought at a garage sale. Probably time to invest in one that will be good for my crafting and quilting that I’m doing now. This one looks perfect. 🙂

  23. Claire C says

    April 8, 2013 at 12:39 am

    This Iron sounds like the answer to nearly all my dreams, I say nearly because I would love it to come with a fairy who does the Ironing for me and then puts it all a way in the wardrobes and drawers for me as well.

  24. E. Nadler says

    April 8, 2013 at 2:26 am

    If this iron would help me iron better, I’d love to win it!

  25. lisaT says

    April 8, 2013 at 3:06 am

    Would love to win this. My iron is past it’s use-by date and I would put a cordless model to very, very good use!

  26. Linda Hughes says

    April 8, 2013 at 4:05 am

    New to quilting – need all the help I can get with tools, fabric and HELP! Would love to win this great iron to jump start my collection!

  27. judy parsons says

    April 8, 2013 at 5:12 am

    Wow. Sounds like something we all need.
    Judy

  28. Ginger says

    April 8, 2013 at 5:27 am

    My iron is 30 years old. Would love to try something new!

  29. Mary Munsch says

    April 8, 2013 at 5:50 am

    I love my B&D but I go through irons regularly. I burn them up. I am a longarm quilter and so I piece regularly also. I don’t have an iron that turns itself off, because every time I need it it is cold. I am also notorious for leaving the iron on. I do however have it plugged into the same switch as my lights, this means when the lights are off the iron is off. This sounds like an iron worth trying!

  30. Patty Manders says

    April 8, 2013 at 6:38 am

    Sounds like a dream come true. And to think I used to think that ironing when sewing was not a necessity. Live and learn:) Got my fingers crossed that this cordless wonder might be in my future.

    in VT where irons do turn a gal’s head,
    the Vermonster

  31. Janet S. says

    April 8, 2013 at 7:16 am

    I would love to win this iron. My current iron is over 20 years old and should retire. Thanks for the chance to win.

    Janet

  32. Linddylou says

    April 8, 2013 at 7:35 am

    Would love to win this iron but, if I don’t this may be the next iron I purchase. Thanks for the chance to win…

  33. Rose S. says

    April 8, 2013 at 7:38 am

    I cannot wait to read of the giveaway. Congratulations on the new grandbaby-to-be. Wishing a speedy delivery.

  34. Roseanna B says

    April 8, 2013 at 7:56 am

    Oh I hope I win! I have never found an iron or a vacuum cleaner that lasted very long! Thanks for the chance…

  35. Barb says

    April 8, 2013 at 9:12 am

    Have always been happy with my Rowenta but it will need to be replaced soon. Thank you so much for the review.

  36. cynthia says

    April 8, 2013 at 11:16 am

    I have an eight year old granddaughter just learning to sew and what a joy to be able to work with her!!! The iron that I use is old and heavy. It would be great to let her use an iron that is easier and cordless to learn with. Thanks for the contest and I hope Q and I win!!!!

  37. Laura Long says

    April 8, 2013 at 3:46 pm

    Just got a new sewing machine, now all I need is a new iron!

  38. Brenda B says

    April 8, 2013 at 4:31 pm

    What a great iron!! Love the idea of cordless. Yes, I would be so blessed to win.

  39. Linda Eggleston says

    April 8, 2013 at 8:47 pm

    Would love the opportunity to try this iron and love the fact it is cordless as my iron always gets tangled up in the telephone cord when I am ironing, yes I still have a phone with a cord! Nice of Panasonic to offer a give away and I’ll keep my fingers crossed.

  40. Cathy says

    April 9, 2013 at 6:22 am

    I have kicked many an iron to the curb and out into the street to be run over and put it out of its misery! I’d love this iron if it is all you say it is.

Have you read?

How to Make String Quilt Blocks (Turn Fabric Scraps Into a Beautiful String Quilt)

If you’ve got a basket of long skinny fabric scraps and no idea what to do with them, string quilt blocks are your answer.

String quilting is one of the easiest and most forgiving scrap quilt techniques. It uses narrow strips of fabric sewn onto a foundation to create bold, colorful blocks that look far more complicated than they actually are.

In this step-by-step guide, you’ll learn exactly how to make string quilt blocks, what size scraps work best, how to keep them balanced, and how to turn them into a finished quilt.

What Is a String Quilt Block?

A string quilt block is made by sewing fabric strips (or “strings”) onto a foundation piece of fabric or paper.

The strips are usually:

  • 1″–2½” wide
    • Different lengths
    • Mixed prints and colors

The result is a layered, textured block with diagonal or straight-line movement.

String quilts are ideal for:

  • Scrap bins
    • Leftover binding strips
    • Jelly roll leftovers
    • Long skinny offcuts

They are one of the most waste-efficient quilt styles.

Why String Quilts Are Perfect for Scrap Fabric

String quilts are forgiving because:

  • Strip width doesn’t have to be identical
    • Seams don’t need to align
    • Color placement can be random
    • Slight inconsistencies add charm

This makes string quilting perfect for beginners who want to build confidence without worrying about perfect matching seams.

What Size Scraps Work Best for String Quilt Blocks?

Here’s what works beautifully:

Best strip width:
1½” to 2½”

Minimum length:
At least 6″–8″

If your strips are shorter, sew them together first to create longer “strings.”

If you only have very tiny scraps, crumb quilting may be a better option.

Supplies You’ll Need

  • Assorted fabric strips
    • Foundation fabric (muslin or lightweight cotton)
    • Rotary cutter & ruler
    • Sewing machine
    • ¼” seam allowance

Optional:
• Add a center accent strip for visual structure

Step-by-Step: How to Make String Quilt Blocks

Step 1: Cut Your Foundation

Cut foundation squares slightly larger than your finished block size.

Example:
For a 10″ finished block, cut foundation pieces 11″.

You’ll trim them down later.

Step 2: Place Your First Strip

Lay your first strip right side up, diagonally across the foundation.

This will anchor the block.

Some quilters like to use a consistent center strip for cohesion.

Step 3: Add the Second Strip

Place a second strip right sides together on top of the first strip.

Sew with a ¼” seam.

Flip open and press.

Step 4: Continue Adding Strips

Keep adding strips to one side until you reach the edge of the foundation.

Then flip the block and fill the opposite side.

Press regularly to prevent bulk.

Step 5: Trim the Block

Once the foundation is fully covered:

Flip block foundation side up.
Trim to your exact unfinished size.

If your finished block is 10″, trim to 10½”.

This squaring step is important.

Popular String Quilt Layout Ideas

String quilt blocks are surprisingly versatile.

Try:

  • All diagonal strips same direction
    • Alternate block rotation
    • Chevron layout
    • Controlled color gradient
    • Neutral center strip
    • Red center “spine” for classic look

Rotating blocks creates secondary patterns automatically.

How Many String Quilt Blocks Do You Need?

For 10″ finished blocks:

Baby Quilt (40″ x 50″) – 20 blocks
Lap Quilt (50″ x 60″) – 30 blocks
Throw Quilt (60″ x 70″) – 42 blocks
Twin Quilt (70″ x 90″) – 63 blocks

Adjust based on sashing and borders.


How to Keep String Quilts From Looking Chaotic

Scrap quilts need balance.

Use one or more of these tricks:

  • Repeat one neutral strip in every block
    • Keep background color consistent
    • Limit to 2–3 dominant color families
    • Alternate light and dark blocks
    • Add sashing

Structure keeps string quilts from feeling messy.

Beginner Mistakes to Avoid

  • Using strips that are too narrow (creates bulk)
    • Not pressing seams
    • Skipping trimming step
    • Mixing drastically different fabric weights
    • Forgetting seam allowance when trimming

Foundation fabric prevents stretching — don’t skip it.

Paper vs Fabric Foundation for String Quilts

Fabric foundation:
• Stays in quilt
• Adds stability
• Faster

Paper foundation:
• Removed after sewing
• Lighter finished quilt
• Slightly more work

Most beginners prefer fabric foundation.

Why String Quilts Are So Addictive

They’re repetitive in a relaxing way.

You can:

  • Sew without overthinking
    • Use scraps guilt-free
    • Chain piece easily
    • See fast progress

And somehow, those random strips always look intentional once trimmed into a square.

Making String Quilt Blocks

If your scrap basket is overflowing with strips, a string quilt block is one of the smartest ways to use them.

It’s forgiving.
It’s flexible.
And it turns leftover fabric into something bold and cohesive.

You don’t need perfectly matched prints.
You just need a consistent block size and a little trimming discipline.

The rest is just stitching.


Categories

Christmas quilts Craft Competitions Craft News and Events Free Quilt Patterns Modern More Quilting Patterns & Projects Quilting Art Quilts Quilting Blocks Quilting Books Quilting Contest Quilting Events Quilting Fabric Quilting Gift Ideas Quilting How To & Tutorials Quilting Inspiration Quilting Products Quilting Technique Scrap Fabric Tutorials and Patterns

RSS feed: More Articles More Articles

  • Free Vintage Halloween Junk Journal Printables – Candy, Torn Ephemera and Spooky Pockets
  • Free Felting Tutorial Friday: Felted Birdie
  • Book Review: I Am Indigenous
  • How to Create an Autumn Gatefold Mini Scrapbook Album
  • DIY Macrame Ghost Wall Hanging – Spooky Halloween Decor Made Easy
  • Everly Crochet Baby Blanket Pattern Review – Rosette Motifs and Sweet Vintage Style
  • Designer Spotlight: Stitching Elf Store
  • Book Review: The Knitter’s Sweater Fitting Bible
  • Nipping and Tucking Digital Stamps: How to Edit, Customize and Perfect Digi Images for Cardmaking
  • Cotton Companion Free Crochet Bag Pattern

Copyright © 2026 · CraftGossip | Start Here | Contact Us | Link to Us | Your Editors | Privacy and affiliate policy