• Home
  • Suggest A DIY
  • DIY Newsletter

Quilting

Patterns, patchworks and projects

  • About CraftGossip
  • Our Network
    • Bath & Body Crafts
    • Candle Making Ideas
    • Crochet Ideas
    • Cross Stitch
    • Edible Crafts
    • Felting Patterns
    • Glass Art
    • Home & Garden Ideas
    • Indie Crafts
    • Jewelry Making
    • Kids Crafts
    • Knitting Patterns
    • Lesson Plans
    • Needlework
    • Party Ideas
    • Polymer Clay
    • Quilting Ideas
    • Recycled Crafts
    • Scrapbooking
    • Sewing Patterns
    • Stamping
    • DIY Weddings
    • Not Craft Ideas
  • Giveaways
  • Roundups
  • Christmas
  • Search

How to Sew Together 60º Fabric Triangles

September 28, by Claudia Porter. Leave a Comment

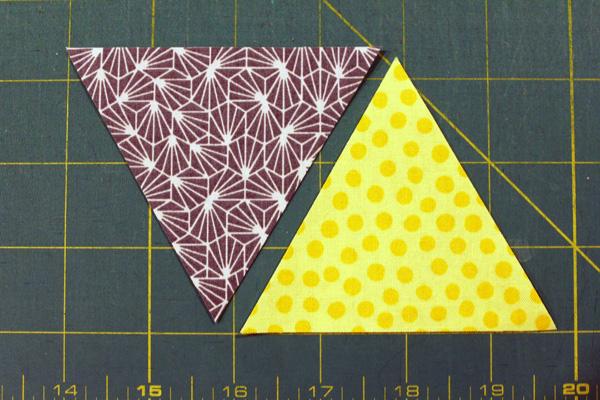
One shape you tend to see a lot of in quilting is the standard 60º triangle.  It looks easy but it can be a little tricky, especially for the beginner.  This handy tutorial from Sassafras Lane Designs shows you how to sew this popular shape together.  Not only that, but if you are unsure of how to cut one out (yes it can be tricky too) there is a link to a tutorial to help you out.

In the article you will find step by step instructions on the assembly and sewing.  There are also tips for pressing.  The photos are all well labeled with text showing you exactly what you are looking at.

You will master this skill in no time with this article.  Click here to get it: Sewing Triangles

[photo from Sassafras Lane Designs]

Next Quilting Pattern:

  • Quilting - Half Square Triangles - 8 at a time
    Quilting - Half Square Triangles - 8 at a time
  • Rainbow Triangles Mini Quilt Tutorial
    Rainbow Triangles Mini Quilt Tutorial
  • How to Cut Equilateral Triangles - Three Ways
    How to Cut Equilateral Triangles - Three Ways
  • Book Review - Squares and Triangles: 13 Fun Patterns For Innovating And Renovating
    Book Review - Squares and Triangles: 13 Fun Patterns For…

Share this:

  • Click to share on Facebook (Opens in new window)
  • Click to share on Pinterest (Opens in new window)
«
»

Have you read?

Video Tutorial – Easy Charm Pack Quilt

Here’s what you can do with your spare Jelly Roll strips and stash: construct a gorgeous quilt! Kimberly made her Jelly Roll Scrap Quilt with 13 additional Jelly Roll strips left over from another quilt, as well as extra background.  Check out her starching skills, you can also DIY and make your own spray starch for quilting.

1. Mix 1 1/2 tbsp cornstarch with 2 cups of distilled water until all lumps are dissolved.
2.  Fill a glass spray bottle.


Enjoy a brief quilting time lapse of Kimberly constructing the quilt after watching a basic block instruction with additional Jelly Roll strips!


Share this:

  • Click to share on Facebook (Opens in new window)
  • Click to share on Pinterest (Opens in new window)

Leave a ReplyCancel reply

RSS From The Network

  • How to Color Die Cuts for a Halloween Witch Card
  • 4 FREE Autumn Journaling Pocket Cards
  • How to make an adorable faux fur wiggle eye cuff perfect for Halloween
  • Easy Pumpkin Crafts for Kids
  • Girl’s Strawberry Cardigan – Knitting Pattern
  • Pumpkin Cross Stitch Patterns
  • How to make your own washi tape
  • Knit Your First Shawl — It’s a Piece of Cake
  • Free Crochet Pattern – Fruit Pies
  • Long Cabled Vest – Free Knitting Pattern

Trending popular ideas

7 Quick & Easy Quilt Patterns
6 Tips For Machine Quilting
25 Free Scrap Fabric Christmas Ornament Patterns
15 Free Quilted Christmas Table Runner Patterns
10 Free Halloween Quilt Blocks
How to Make a Quick and Easy Table Runner with Strips
8 Disappearing Quilt Patterns
9 Free Motion Quilting Patterns
15 Free Halloween Quilted Table Runner Patterns
11 Free Leaf Quilt Block Patterns

Copyright © 2023 · CraftGossip | Start Here | Contact Us | Link to Us | Your Editors | Privacy and affiliate policy