If your scrap bin is bursting with tiny leftover pieces and you can’t quite throw them away… welcome to crumb quilting.
A crumb quilt is one of the most forgiving, creative, and satisfying quilting projects you can make. It turns the smallest fabric scraps — even pieces too small for traditional blocks — into something completely beautiful.
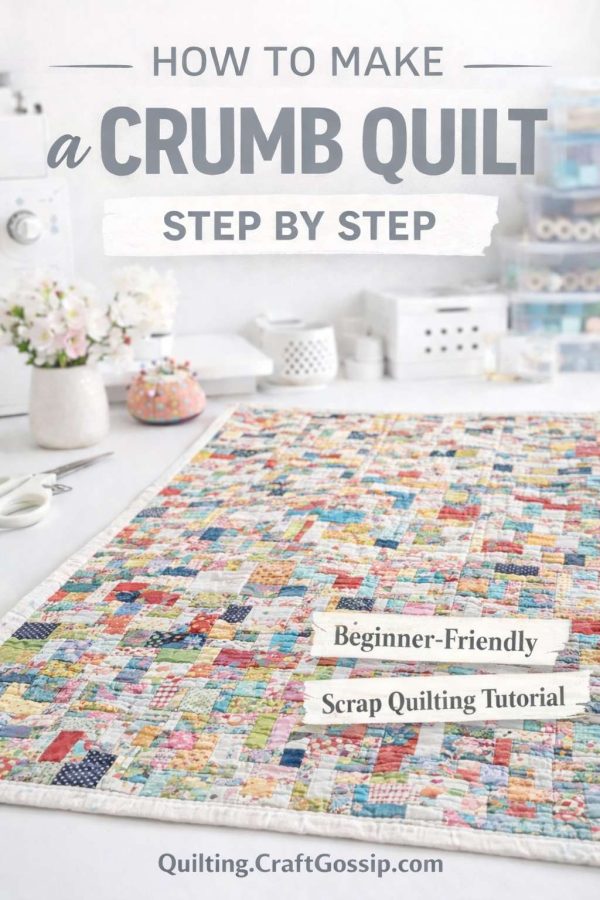
Today I’m walking you through exactly how to make a crumb quilt step by step, including cutting tips, layout ideas, pressing tricks, and how to turn your crumbs into finished quilt blocks without stress.
Whether you’re a beginner quilter or a seasoned scrap lover, this is the ultimate guide to crumb quilting.
What Is a Crumb Quilt?
A crumb quilt is made by sewing together small, irregular fabric scraps (called “crumbs”) into larger fabric units. These crumb units are then squared up and sewn into blocks to form a quilt.
Unlike traditional patchwork:
- There are no set block patterns
• Pieces don’t need to match
• Shapes are irregular
• It’s improvisational quilting
Crumb quilting is often called “improv quilting” or “scrap quilting,” but crumb quilts specifically focus on very small leftover pieces.
And yes — even those weird triangle corners you trim off Flying Geese blocks can be used.
Why Make a Crumb Quilt?
There’s something deeply satisfying about using every last piece of fabric.
Benefits of crumb quilting:
- Uses tiny scrap fabric pieces
• Reduces fabric waste
• Great for memory quilts
• No precision stress
• Beginner-friendly
• Budget-friendly quilting
It’s also perfect if you’re in a creative slump. There are no rules to follow — just sew and see what happens.

How to Make a Crumb Quilt Step by Step
Let’s break this down clearly so it feels manageable.
Step 1: Gather Your Fabric Scraps
Start with:
- Small leftover fabric pieces
• Trimmings from previous quilt blocks
• Odd-shaped scraps
• Narrow strips
• Small squares
Avoid stretchy knits — stick with quilting cotton for best results.
Tip: Press scraps before sewing. Flat fabric behaves better.
Step 2: Start Sewing Scraps Together
Take two scraps, right sides together, and sew with a ¼” seam.
Press open.
Then add another scrap to the growing piece.
Keep building outward.
There is no pattern. Just continue sewing scraps to scraps until you have a larger fabric “crumb slab.”
This is the heart of crumb quilting — slow, steady piecing.
Step 3: Create a Crumb Slab
Continue adding scraps until your slab is slightly larger than your intended block size.
Example:
If you want 8½” unfinished blocks (8″ finished), build your crumb slab to about 9″–9½” before trimming.
This gives you wiggle room to square it up.
Step 4: Square Up Your Blocks
Once your crumb slab is large enough:
- Place a quilting ruler over the slab
• Trim it into a clean square
Common crumb quilt block sizes:
6½” unfinished
8½” unfinished
10½” unfinished
Choose one size and stick with it for consistency.
Step 5: Repeat and Build Blocks
Continue making crumb slabs and squaring them into identical blocks.
The more variety in fabric, the more interesting your quilt will look.
Don’t overthink color placement. Crumb quilting thrives on randomness.
Step 6: Arrange Your Crumb Quilt Layout
Lay your blocks out on a design wall or floor.
You can:
- Keep them random
• Separate by color tone
• Add sashing between blocks
• Mix with solid fabric blocks
• Add borders
If the quilt feels too busy, adding solid sashing helps calm the design.
Step 7: Sew the Quilt Top Together
Sew blocks into rows.
Then sew rows together.
Press seams carefully to reduce bulk — crumb quilts can get thick because of all those seam allowances.
Pressing tip: Press seams open to reduce bulk buildup.
Step 8: Quilt and Bind
Because crumb quilts are highly pieced, simple quilting works best.
Try:
- Straight-line quilting
• Diagonal crosshatch
• Gentle curves
• Stitch-in-the-ditch
Finish with binding — scrappy binding looks especially charming with crumb quilts.
Best Fabric for Crumb Quilts
Crumb quilts work beautifully with:
- Bright scraps
• Vintage florals
• Low-volume prints
• Neutral backgrounds
• Bold modern fabrics
You can also make monochrome crumb quilts using only blues, only reds, or only neutrals.
If your first attempt feels chaotic, try limiting your color palette next time.
Common Crumb Quilting Mistakes (And How to Avoid Them)
Even though crumb quilting is relaxed, there are still a few things to watch for.
Too much bulk
Press seams open and trim excess fabric where necessary.
Blocks warping
Don’t stretch fabric while sewing. Bias edges can distort easily.
Inconsistent block sizes
Always square up carefully using a ruler.
Too busy visually
Add sashing or a solid border to give the eye somewhere to rest.
How Big Should a Crumb Quilt Be?
Here’s a quick size guide:
Baby quilt: 36″ x 45″
Lap quilt: 50″ x 60″
Throw quilt: 60″ x 70″
Twin quilt: 70″ x 90″
If using 8″ finished crumb blocks:
Baby quilt requires about 25 blocks
Lap quilt requires about 48 blocks
Throw quilt requires about 63 blocks
Adjust based on layout.
Why Crumb Quilts Are Perfect for Scrap Quilters
If your scrap basket keeps refilling itself (same here), crumb quilting is the ultimate solution.
Instead of waiting for “just the right project,” you can:
- Sew scraps as you go
• Build crumb slabs slowly over time
• Store squared blocks for future quilts
It’s a long-game quilting method — and it feels wonderfully productive.
Learning how to make a crumb quilt step by step is less about perfection and more about freedom.
There’s no matching corners.
No precise triangle math.
No stress.
Just scraps, sewing, pressing, trimming — and eventually, a quilt that tells the story of everything you’ve made before.
And honestly? That’s what makes crumb quilting so special.