Rag quilts are a popular choice for anyone looking to add some warmth and coziness to their home. With their soft, fluffy seams and charming, rustic appeal, rag quilts are the perfect choice for anyone looking to create a comfortable and welcoming atmosphere. If you’re interested in making your own rag quilt, you’re in luck!
There are so many great patterns available online, ranging from simple and beginner-friendly to more complex and intricate designs. In this roundup, we’ll be showcasing some of the best rag quilt patterns available, so you can find the perfect one for your next sewing project.
Whether you’re a seasoned pro or just starting out, you’ll find a pattern that suits your skill level and style. So grab your fabric and get ready to start sewing!
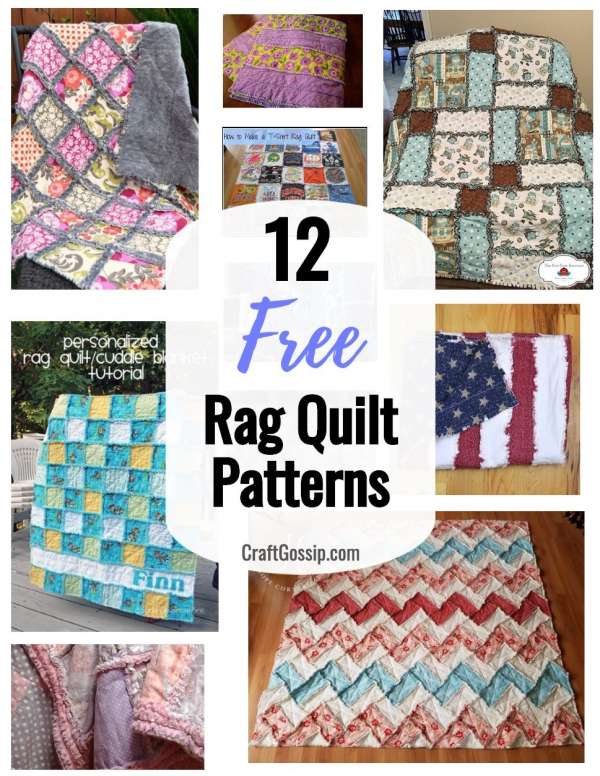
If you have ever wanted to try making one, or if you’re looking for a new design to try, here are 12 free rag quilt patterns to inspire you. Looking for more Rag Quilt patterns? Check out these Rag Quilt books.
Inspired Quilting by Lea Louise brings us a method for making a blue jeans rag quilt with no backing.
Soft and cuddly, this rag quilt tutorial from Bright Green Door is supposed to take only 3 hours to make. Wow!
Learn how to personalize a rag quilt with this helpful tutorial from Cocoa Pie Creations.
Alanda Craft shows us how to make the “easiest ever” rag quilt with this video and step-by-step tutorial.
This looks warm and cozy in the pictures from The Crafty Blog Stalker. Here’s how to make a rag quilt with Minky.
Ever wanted to know how to add a ruffled border to a rag quilt? You can learn with this tutorial from Inspired Quilting by Lea Louise.
Check out this unique and special t-shirt rag quilt tutorial from Sweet Tea in the South.
Heather Handmade brings us this patriotic tutorial for how to make a flag rag quilt.
Learn how to make a rag quilt with this tutorial from The Flip Flop Barnyard.
Here’s a fun tutorial from Modernly Morgan on how to make a rustic rag quilt.
Check out this beautiful chevron rag quilt pattern from Hope Corner Farm.
Hometalk brings us another denim rag quilt pattern and includes a video tutorial too.
And now for some history lesson!
Quilts made from rags are said to have originated in the 1700s. Pioneers created solutions for shelter and warmth by utilising leftovers from worn-out garments and fabric scraps. Rag quilts were made in a variety of ways. These quilts were used for warmth and insulation, as well as for clothes and menstrual supplies.
Rag quilts are a fun and easy project that can add a cozy touch to any home.
Here’s a tutorial for making a basic rag quilt
Materials needed:
- Fabric in a variety of colors and patterns (at least 20 different fabrics, each in a 1/4 yard cut)
- Batting (either cotton or polyester)
- Sewing machine
- Sewing supplies (scissors, pins, thread)
Step 1: Cut your fabric into squares. You’ll need at least 20 different fabric squares, each measuring about 10 inches by 10 inches. You can choose a variety of colors and patterns to make your quilt more interesting.
Step 2: Layer your squares. Place two fabric squares right sides together, with the batting on top. Pin in place. Repeat with the remaining squares until you have a stack of 10 sets of fabric squares.
Step 3: Sew the squares together. Using a sewing machine, sew a line of stitches down the center of each set of squares, about 1/4 inch from the edge. Leave a few inches unsewn at the beginning and end of each line of stitches to allow for turning and stuffing.
Step 4: Turn and stuff the squares. Turn each set of squares right side out and stuff the batting into the opening. Use a pencil or chopstick to push the batting into the corners and smooth it out.
Step 5: Sew the quilt together. Lay out your squares in the pattern you want for your quilt, with the stuffed side facing up. Sew the squares together along the lines of stitches, using a 1/4 inch seam allowance.
Step 6: Trim the excess batting. Once the quilt is assembled, use a pair of scissors to trim the excess batting from the edges. Be sure to leave about a 1/2 inch seam allowance around the edges.
Step 7: Finish the quilt. Fold the seam allowance under and pin in place. Sew around the edges of the quilt, using a 1/4 inch seam allowance, to secure the seam allowance and finish the quilt.
That’s it! Your basic rag quilt is now complete. You can add more complexity to your quilt by using different patterns and layouts, or by adding additional fabric layers. Happy sewing!


Leave a Reply